Uncategorized

Cold Process Soap for Beginners

Soap 1 (the basics) Palm Free Workshop AGE RESTRICTION APPLIES

Soap 1 Basics – Palm Free (approx. 1lb)

Read through the entire recipe to familiarize yourself with the safety proceedures. We have included both weight measure & volume measures when you do not have a scale s.  Once you get the hang of it, use a scale to measure your ingredients. The video shows the steps using a scale.

 Cold-Processed (CP) SoapThe goal is to create a mild soap that cleanses and moisturizes without synthetic intrusion!  Recipe could be doubled or tripled. For best results insulate the soap immediately after it has been poured a mold. 

Here is a video tutorial from Elly’s Everyday:  https://www.youtube.com/watch?v=Kc7duzDEa6Y  Our forrmula is different and the tutorial is to show the steps for a fabulous handmade soap.

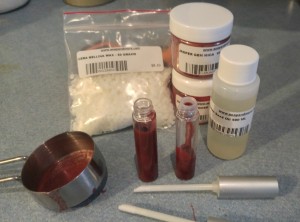
Tools & Equipment you will need for your soap project

  • Stainless steel pan 2 liters or so (never alluminium)
  • Silicone spatula
  • Stick blender or hand held blender
  • Goggles
  • Face Mask
  • Cardboard to cover mold
  • Old blanket or towel
  • 2 cup plastic cup x 2
  • Rubber gloves
  • Thermometor, laser or any food


 Ingredients

Oils/Fats

1/3 cup and 1/4 cup (4.2 oz/119 g) melted Coconut Oil

1/2 cup and 1/3 cup (6.6 oz/188 g) Pomace Olive Oil

3 TBSP (1.2 oz/34 g) melted Cocoa Butter

Lye Solution

WARNING: Always add the solid form lye (sodium hydroxide ) to the liquid. If the liquid were added to the solid form lye a violent reaction could result. In other words there could be a “volcano” eruption out of the container.

3 TBSP (52 g) Sodium Hydroxide

1/2 cup and 1 TBSP (4.56 oz/130 g) cold Water, distilled or filtered


Optional Additivesadded at trace

1/2 TSP – Sodium Lactate (optional- added to water before lye for a harder bar)

3 TBSP – Castor Oil

1/2 TSP Grapefruit Seed Extract or Vitamin E Oil

1 1/2 to 2 TSP (100 to 120 drops) – Fragrance or Essential oils

1 Spritz – Denatured or Isopropyl Alcohol

Directions

  1. Work in a well-ventilated area. While wearing rubber gloves, a protective respirator and protective eyewear, add the lye to cold water, mix and allow to cool to between 85 F to 110 F. Use a flat plastic tool to mix the lye mixture until the lye crystals are fully dissolved. This should take approx. 1 minute or less.  If the lye mixture gets too cold put container in a warm water bath until desired temperature is reached.  Remember lye is corrosive.  Always be extremely careful when working with it. Never use pyrex or alluminium conainers or tools.


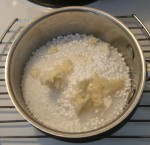
  1. Warm the Oils/Fats in a pot until melted, and allow to cool to between 85 F to 110 F. When only small bits of cocoa butter and coconut oil remain in the pots, remove from heat as the mixture will melt the remainder of these oils.


  1. Line the mold with parchment paper and grease the sides with any vegetable oil (castor oil used in class) and have them ready.


  1. Choose the essential oils and place aside.


  1. Pour the lye solution into the oils/fats and mix with a stick blender. Watch this step and ensure no soap mixture splatters out of the container. Make sure to scrape the sides with a spatula to ensure no mixture is left on the edges.


  1. Continue blending until a small amount of soap drizzled across the soap’s surface leaves a faint pattern (called tracing) before sinking back into the mass. Now the soap is ready for the additives. Add the optional additives at this point. Add the essential oils last, as they can harden the soap quicker.  So be careful to have the molds ready and waiting.


  1. When the essential oils are added stir with a spatula for twenty to thirty more seconds or for as little time as needed to fully incorporate the essential oils. Pure essential oils are usually cooperative, whereas some synthetic fragrance oils are more likely to streak and seize the soap.


  1. There are two methods from here:
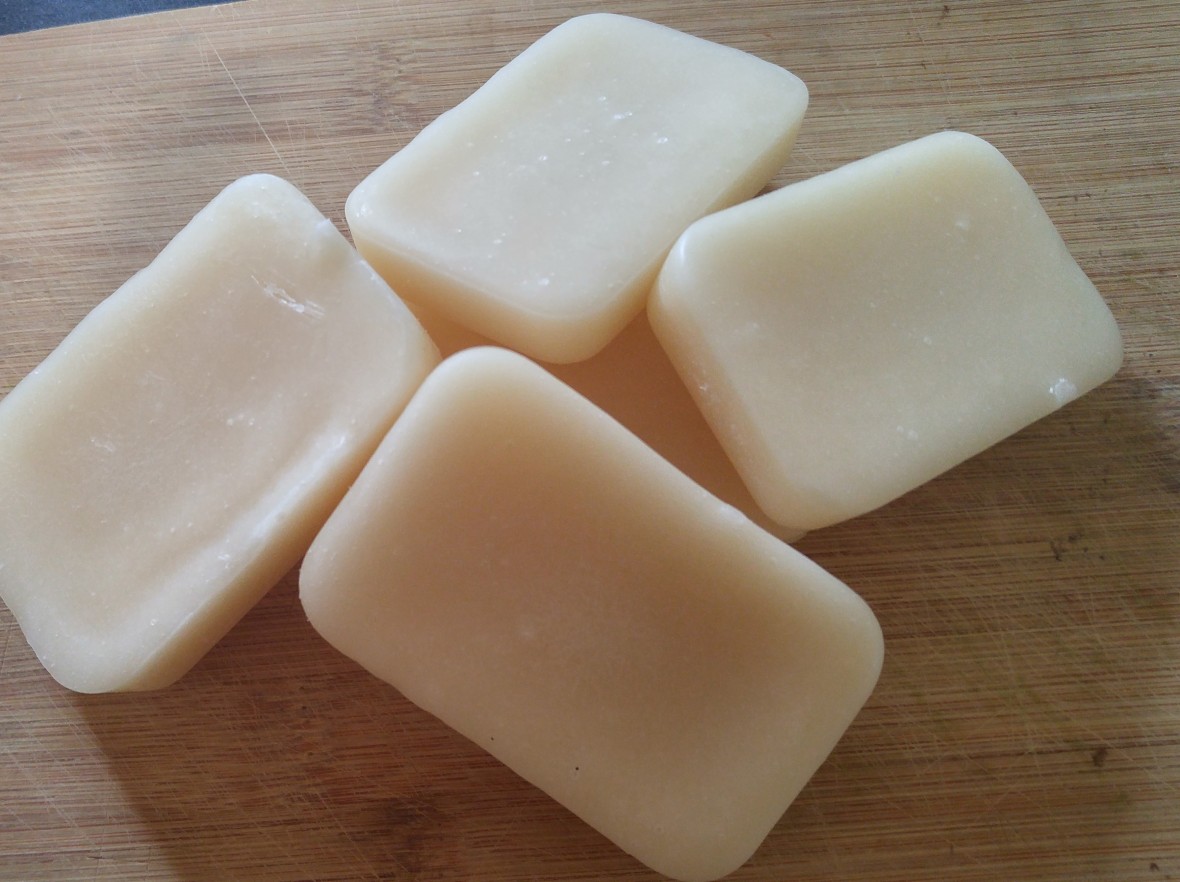
  • The first method is to cover the soap to incubate it and allow to “gel” for 4-6 hours. The soap should feel firm like hard cheese before removing. We recommend that you remove it after 4-6 hours or you risk that it will crumble when cutting.  After the soap can be removed from the mold by running a bread knife around all sides and pulling the mold away from the soap.  Turn the mold upside down to remove the soap.  If it does not come out of the mold, place the soap in the freezer for 2 hours and try to remove it again.  Then, after is has been at room temperature for an hour, cut the soap.


  • The second method is placing the soap in the freezer immediately after it has been poured. This bypasses the gel stage. Freeze it for 8-12 hours and remove it from the mold, cut after 1 hour or so.  The advantage to this method is there is no gel discoloration and the soap feels creamier. The disadvantage is the scent seems to diminish more than the first method.


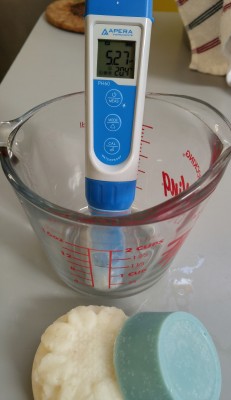
  1. Wait 4-6 weeks to use the soap, or check the PH of the soap periodically during this time. A PH range of 8-10 is ideal.

 NOTES:

  • Always ensure to MEASURE EXACT PROPORTIONS when making soap.
  • Never use aluminium pots, utensils or bowls, as the lye will react with this metal. Use stainless steel or vision pots; plastic, glass or stainless steel bowls; plastic utensils.
  • Expiration: 6-8 months without antioxidant or 8-16 months with antioxidant


Ingredient Properties:

Coconut oil is obtained from copra, which is dried coconut meat.  A percentage of coconut oil in cosmetics is moisturizing.  Too much of it can be drying.  Its saturated nature resists rancidity and makes a very hard soap, yet its low molecular weight allows for high solubility and a quick, fluffy lather, even in cold seawater.  Even companies manufacturing tallow soaps use about 20% coconut oil for its lathering and moisturizing properties.


Pomace Olive oil has a history of healing, and the prevention of fatigue, hypertension and rheumatism. It is a very good moisturizer, not because of its own healing properties, but because it attracts external moisture, holds the moisture close to the skin, and forms a breathable film to prevent loss of internal moisture.  It is rich in oleic and linoleic acid and arachidin and palmitin-two important polyunsaturated fatty acids.  Extra-virgin olive oil is the most desirable grade for the gourmet chef, but grades A and B are best suited for soap making.  Olive oil can be difficult to saponify, however mixed with other oils it works well.  Pomace olive oil provides the quickest saponification, though it produces a darker soap.


Cocoa  Butter  is extracted from the Cacao Bean and carries a rich pleasant chocolate aroma. Cocoa Butter-Natural Wafers have high oxidative stability as a result of being naturally rich in antioxidants. Cocoa butter is solid at room temperatures, but melts easily on contact with the skin. Prevents drying of the skin and development of wrinkles. Reduces degeneration of skin cells and restores skin flexibility.  Produces a hard, moisturizing bar of soap.


Lye has two meanings: It is the solid form of a caustic alkali, and it is also the water solution in which a caustic alkali has been dissolved.  To avoid confusion and distinguish between the two, refer to the chemical, sodium hydroxide, as “sodium hydroxide or caustic soda” and the sodium hydroxide/water solution, as “lye.”  The lye solution is a slippery, strongly alkaline substance.  It is this base that reacts with fats and oils to make soap. It is corrosive, so avoid getting any pure lye or uncured soap on the skin.


Sodium Lactate is used to help harden soap. It is a great additive to use in soap with a high content of olive oil- like this one- as olive oil, while incredibly rich and moisturizing, is quite soft and will dissolve more quickly when used.


Castor Oil is traditionally used in rich emollient bar soaps. This oil has even been used in salves and body balms or liquid lip products. Often used in making transparent soaps too!  In combination with other oils and as a super fatting agent, castor oil lends emollience to soap formulations. It, however, should be used at a low percentage to keep the soap from becoming too soft.


Grapefruit Seed Extract or Vitamin E Oil are antioxidants added to the soap to prolong the shelf life of your bar.


Distilled water or filtered water is recommended for use in soap making because pure, soft water contribute to pure soap.  Contaminated water affects the integrity of the soap.  Hard water contains dissolved mineral salts that react with the sodium hydroxide ions in the lye solution, leaving fewer of these ions to make soap during the saponification process.


Denatured or Isopropyl Alcohol is spritzed on the top of the soap to prevent a layer of soda ash from forming. Soda ash will wash off within the first use, all it does is effect the aesthetics.

What is soap?

Chemically, an acid (the fats and oils) and a base (a solution of sodium hydroxide and water, also called lye) react to produce soap and glycerine.  The process is called saponification, and as the fats and oils and the lye solution come into contact with one another and react, they are saponifying, or making soap

This is the cold-process (CP) method – once the sodium hydroxide solution is added to the melted fats and oils, no external heat is required to keep the soap making reaction going.

The heat of the ingredients is plenty to drive the reaction to completion.  “Cold” does not mean cold; it was coined as a relative term, comparing it to the more common hot soap making temperatures produced when heat is applied – the hot-process (HP) method. Susan Miller Cavitch, Author of the Natural Soap Book, 1997.  Ordinary soap is solely made up of fats and an alkali. In the past, people made their own soap from animal fats and wood ashes.  Today there is very little true soap in the traditional sense on the market. You might recognize these soaps as products marketed with characteristics such as “pure”. “True” soaps are regulated by the Consumer Product Safety Commission, not FDA, and do not require ingredient labeling.  Most body cleansers on the market today are actually synthetic detergent products and come under the jurisdiction of FDA.

These detergent cleansers are popular because they make suds easily in water and don’t form gummy deposits. Some of these detergent products are actually marketed as “soap” but are not true soap in the common and legal definition of the word. If a cosmetic claim is made on the label of a “true” soap or cleanser, such as moisturizing or deodorizing, the product must meet all FDA requirements for a cosmetic, and the label must list all ingredients. If a drug claim is made on a cleanser or soap, such as antibacterial, antiperspirant, or anti acne, the product is a drug, and the label must list all active ingredients, as is required for all drug products.

What are the main differences between commercial and handcrafted soap?
By handcrafting soap, all of the naturally occurring glycerin is retained to add moisture to your skin. Many commercial manufacturers remove valuable glycerin to be sold separately. Today’s commercial cleansing products are full of synthetic detergents, petrochemicals, and artificial preservatives that clog your pores and create dry skin. Also, although everyone still calls them soap, most commercial cleansing products are not soap at all and are actually detergent! If you think about it, you will notice that the word “soap” has quietly disappeared from your favorite bar’s packaging and advertisements sometime over last 20 years. This is because advertising law prevents them from still calling it soap when it is a detergent. They are now labeled “beauty bars”, “deodorant bars”, and “family cleansing bars”, anything but the word “soap”. Commercial bars are often filled with harsh additives, fillers, and chemicals that irritate the skin and cause allergic reactions. Handcrafted soaps rarely contain these.

What is super fatting in soap making? There are a few ways to calculate superfat. The easiest method is to plug your recipe into the http://www.soapcalc.net

All you have to do is select the percentage you want and it will calculate for you.

You can also use the following equation: (1 – % superfat you want). So, if you want to superfat your olive oil soap in the above example by 4%, it would be: (1.34 oz. lye) x (1 – .04) = 1.29 oz. lye.


You can also simplify that – for a one pound batch of soap, a 5% superfat works out roughly to 0.8 oz. of extra oils per pound of soap. We almost always superfat our recipes at 5% because it adds luxury to the soap without making it too soft or inhibiting lather. Superfat is a totally personal thing. Some soap makers go up to 15% and swear by it. It also depends on the recipe. For instance, we recommend superfatting 100% coconut oil soap at 20% so it isn’t too harsh on the skin. Experimenting with a few different superfats is the best way to find the amount you love. It used to be adding some extra fat at trace would be a superfat.  This is only the case with hot processed soap whereby the soap is totally cooked and additional fat at that point is superfatting your recipe.


Making Your Own Mold using sign material:  Take the measurements of the box:  ie LxWxHx0.4 will provide the total amount of oils required to make a recipe fit the mold size. (Keeping in mind that the “height” doesn’t have to come up to the top of the box, pour a smaller amount if desired) and then enter the recipe into a soap calculator and resize as required.


403-217-2346     www.soapandmore.com

Scent Blends To Try At Home for CP Soap – 1 lb

100 drops – Lemongrass

25 drops – Geranium

15 drops – Lemon

Fresh and clean, with a little extra.


100 drops – Orange 5X

25 drops – Ginger

15 drops – Cinnamon Leaf

Sweet and spicy.


50 drops – Lavender

25 drops – Spearmint

50 drops – Rosewood

Fresh and slightly foresty- it never gets old!


50 drops – Ylang-Ylang

100 drops – Orange (sweet or 5X)

Citrus with a floral twist.

60 drops – Lavender
40 drops – Lime
20 drops – Peppermint
Herbal heaven!

125 drops – White Grapefruit
25 drops – Cedarwood
Great unisex scent.

50 drops – Rose Geranium
50 drops – Lavender
25 drops – Ylang-Ylang
Just like a fresh bouquet!

75 drops – Scotch Pine
30 drops – Peppermint
30 drops – Eucalyptus
Verdant and herbal!

Uncategorized

Oatmeal, Butter Ultra Intensive Lotion

Our formula includes occlusives that block water from evaporating from the skin, especially good for dry and dehydrated skin, emollients that smooth skin and help repair and humectants to draw moisture to the skin.

(yields approx. 1L)

Ingredients:

Oil Phase 

1 TBSP (8 grams) – Stearic Acid

1/3 CUP (45 grams) – Cetyl Alcohol

1 TBSP (12 grams) – Emulsifying Wax

1/3 CUP (90 grams)- Vegetable Glycerin

1 TBSP (10 grams) – Murumuru butter

1 TBSP (10 grams) – Cocoa Butter

4 tsp (10 grams) – BTMS 25

Water Phase

2 CUPS – (560 grams) – distilled (purified) water

Final Phase

2 cups (373 grams) – distilled water room temperature or cold

2 tsp (5 grams) Colloidal Oatmeal powder added to above water room temperature water

1.5 tsp (7 grams) Optiphen Plus (added when temperature is 80C or below)

1 tsp (5 grams) Luxglide N350

1TB (10 grams) Jojoba Oil

1 tsp (3 grams) Hydrolyzed Silk or other protein

1 TB (10 grams) Sea buckthorn seed Oil

30 to 40 drops – Essential or Fragrance oil (optional) We recommend essential oil at safe usage rate

PH 4.38

Directions:

Heat all ingredients in the OIL PHASE in a pot until melted (Do not overheat/boil).  To be safe a double boiler is recommended
In a separate vessel, heat the water in the WATER PHASE until just boiling. Double boiler is not required
Mix heated WATER PHASE and heated OIL PHASE together with a hand mixer or stick blender.  Blend for about two minutes to ensure that both phases have thoroughly emulsified.
Begin the FINAL PHASE by adding the 2 cups of distilled water room temperature or cold water.
Next, add the remaining ingredients and blend well.
Pour into your containers.  Make sure it has totally cooled down before putting the caps on.
Shelf life with preservative – 12 to 16  months

Uncategorized

DIY Clay Masks

The beauty of a DIY (Do It Yourself)is that it gives you the freedom to use the most powerful, yet simplest pure ingredients on earth or to mix and match them your other favorite ingredients you may have at home to make and build a skincare routine that best fits your needs.

  • Simply chosen clay with Water until it is smooth in texture and apply it to your skin. Leave it on for 10 minutes to get the maximum benefits.
  • Use it as the first step to build your DIY recipe, mix it with one of your oils or plant-based hydrosols for additional anti-aging and calming benefits to the skin.  Try adding some green tea powder, honey, yogourt, whipped egg whites or mayonnaise.
  • Add your favorite exfoliator or add some fine salt or sugar with your oil for the perfect anti-oxidant, environmentally friendly scrub.
  • It is not recommended to prepackage your masks as the addition of water-based ingredients will require a preservative.
French Green Clay is highly efficient at drawing oils and toxins from the skin, therefore use this clay for oily skin and hair types. Limit to 1 application per week. Do not use for sensitive or dry skin types.
Rhassoul Clay’s most impressive properties in skin improvement are its capacity of absorption due to its high level of absorption & silky texture. Studies have shown that it is reputed to reduce dryness and flakiness, improve skin clarity and elasticity. It contains a higher percentage of silica, magnesium, potassium, and calcium than other clays. Despite its powerful absorbing properties, rhassoul also works for dry and sensitive skin. 

Kaolin clay (China, Lion or white clay) is the mildest of all clays and is used in cosmetic masks and soaps for sensitive skin as well as dry skin. It does not expand with increasing water content.

Rose clay or pink clay is a mild clay which will gently cleanse and exfoliate the skin. Pink Kaolin Clay does not draw oils from the skin and can, therefore, be used on dry skin types.  A facial mask may be used once a week to draw out toxins and impurities from the skin.

French red clay: Unlike some cosmetic clays, red clay moisturizes well and will not easily dry out your skin. Probably not the best skin care clay for oily skin types (use French green clay for that), but it is great for those who suffer from dry skin conditions.

Bentonite clay is composed of volcanic ash sediments that have been weathered over a long period of time. Sodium bentonite clay is known for its swelling properties, as it acts like a sponge when mixed with water. This clay is very popular for facial masks, foot baths, or bath soaking blends.

Dry Characteristics: The dry clay has a neutral scent and a pale, off-white color. The texture is slightly grainy, but it smooths out when pressed between the fingers. While it does leave something of a powdery coating behind when brushed off, the dry clay doesn’t stick to the skin too much.

Wet Characteristics: When wet, the clay paste is off-white in color with a smooth consistency. If liquid is added in too slowly, clumps will form, and the use of a whisk is helpful for keeping a smooth consistency. This wet clay spreads smoothly on skin, and its thick texture is reminiscent of cooked oatmeal.

Uncategorized

Dry Shampoo

INGREDIENTS:

  • 87.5% Arrowroot powder
  • 5% Modified tapioca starch
  •  .05%  Lavender essential oil & Peppermint essential oil
  • 1% Pentsia powder as a texture enhancer
  • 1% Silica microspheres for a silky feel and oil absorber
  • 5% Bentonite clay for very oily hair

Directions:

  1. Blend all ingredients together. Use a powder spray bottle to easily distribute on your scalp and roots.  Try and apply evenly.
  2. Allow the product to sit for a couple of minutes.
  3. Once it has had a few minutes to work into the hair and roots, comb or blow-dry it to help it blend well.
  4. If the last 3 ingredients are not available, switch out with the arrowroot powder.
Recipes

Lip Gloss Stain

Fall is here just in time to highlight our lip gloss tubes with wand applicator.  Here is a simple formula to try at home with just a few ingredients:

96% soft oil of your choice.  (can be combined with several oils)

1% Cera Bellina wax (subst with regular beeswax)

1% Vitamin E oil 

*1% flavor( ensure is it oil based)

1% Mica or lake color of your choice (quantity depends on the color and intensity of the desired shade)

Melt the wax and oil at low heat on top of the stove in a small stainless steel measuring cup.  Keep your pot small for small recipes.  We used 1/4 cup for 2 x 11ml size lip gloss tubes. Remove from the heat and add your color and flavor, stir until totally combined.  The mixture will still be warm and can be poured within 1 or 2 minutes.   This recipe is not for lip balm roll-up tubes.  It has a much looser viscosity created especially for lip gloss tubes with wand applicator.

We used Abyssinian seed oil due to its comedogenic rating of 1 which signifies a very low chance of skin irritations.  It is a  very rich super light oil with no noticeable odor or flavor which does not interfere with the final product.

Shade test:  to see if you are happy with the color, take some and spread it onto a paper towel.  If it is not too hot, try some on the back of your hand.  Add more color if required.

*Cautionary note.  If using essential oils for flavor, do your homework.  Some essential oils can burn your lips with very little quantity.  Ones that come to mind:  peppermint, cinnamon & clove

Difference between Cera Bellina and regular beeswax are: Cera Bellina has more of a  satin-like feel on the skin,  less graininess or rice granule effects when using shea and other natural butters in anhydrous formulations., it  also helps to break up pigment cluster and by forming a gel network to maintain an even distribution of ingredients.

Recipes, Uncategorized

Solid Hair Conditioner

conditioning bar ingredients.png Makes 2 x 50 gram bars

conditioning bar heated phase.pngconditioner bar melted phase

Heated Phase
4.5 TB (50 grams – 67%) BTMS-50 
1 TB(10 grams – 5.2%) kokum butter 
2.5 TB (25 grams – 1.13%) cetyl alcohol 
1 TB (10 grams – 5.2%) shea butter 
1 tsp (4 grams 2.1%) black cumin oil

conditioner bar cool down phase

Cool Down Phase
1/2 tsp (1 gram – 1%) hydrolyzed honey protein                                             

1/2 tsp (1 gram -2.1%) panthenol powder (dilute in some water)                     

½ tsp (4 grams -.01%) aloe juice                                                                              

1/2 tsp (1 gram – 1%) hydrolyzed baobab protein                                           

¼ tsp (1 gram .05%) vitamin E oil                                                                         

1/2 tsp (1 gram – 1%) hydrolyzed silk protein                               

1/8 tsp (1-gram – .05%) optiphen plus                                                                       

1/2 to 1 tsp (50-60 drops) (2 grams – .010%)scent  

  • Weigh/Measure your cooldown ingredients and set aside for future use.
  • Weigh/measure the heated phase ingredients into a small saucepan and melt everything together over low medium heat. The temperature should not need to exceed 70C. (invest in a laser thermometer, it is well worth it).  This takes around 12 minutes. Let some of the last bits melt within the warm mixture by removing from the heat and stirring. 
  • If the mixture cools below 61C, the cool phase will bring down the temperature further and start to harden your mixture. It can be reheated gently if required. At low heat only as to not degrade any of your cooldown ingredients.
  • Add the cool phase to the heated phase and mix until combined. Your mixture will start to thicken, so you want to work fast to have nice uniform bars. 
  • Pour into your mold and put into the freezer for 1 hour. Remove from your mold and let the bars sit for 24 to 48 hours to allow any excess moisture to evaporate.  If you do not find the time to remove from the mold right away, no worries as they can be left there indefinitely. They should be solid when you pop them out of the molds.  Store them in a cool dry place.

To Use: Rub the bar in your hands at first then onto wet hair. It will feel soft and silky, unlike a shampoo bar. Rinse and hand dry your hair.  As the conditioning is so high, color treated hair can benefit. 

Substitutions

  • For oily hair:  The BTMS can be 50% 25 and 50% 50.  Not recommended to use 100% BTMS 25 as the 50 is more conditioning, however, oily hair can handle less BTMS 50
  • If you don’t have kokum butter, you can use cocoa butter instead. 
  • It is not recommended to use other emulsifying waxes as they lack conditioning that hair needs. 
  • Cetyl alcohol thickens and helps with a silky glide, unlike stearic acid that can be draggy. That does not mean stearic acid cannot be used.
  • You can omit the panthenol & hydrolyzed proteins but make it up in your BTMS
  • Dandruff prone scalps can benefit when using black cumin oil however it can be substituted with shea butter. Keep in mind there is a slight cumin scent to this wonderful oil.

Ingredient properties:

Aloe Juice – natural keratin to balance ph and helps with an itchy scalp.  Limit concentration to .05%  as aloe cleanses the hair follicle efficiently by stripping off extra sebum (oil) and residue from other hair products.

BTMS-50 ( and BTMS 25)-conditioning emulsifying wax

Kokum butter -moisturizer promotes hair growth

Cetyl alcohol –helps thicken and with spreadability

Shea butter -moisturizes and softens frizzies

Black cumin seed oil -anti-inflammatory, anti-fungal, antibacterial

Hydrolyzed honey protein –penetrates hair to provide moisture, shine, and luster. Improves wet-combability, reduces static buildup when dry combing. Vegans can skip this with no issues in the final product.

Panthenol powder –forms a smooth film over hair cuticles that enhance light reflection and makes tresses look shinier and glossier. A humectant that helps give body & shine and detangling properties to hair. It can cause curly hair to frizz, however

Hydrolyzed baobab protein (or quinoa protein) -a great silicone replacement

Vitamin E oil -Use the naturally derived kind. helps with hair growth & hair loss

Hydrolyzed silk protein -improves elasticity, resiliency, and restores the moisture balance) If you are vegan, skip this ingredient

Optiphen plus -broad-spectrum preservative  

Essential Oil Ideas

Bergamot can be of great benefit to thin, dry hair that breaks.  It increases shine & can help make a protective barrier if you style your hair with heat.  If you have curly or frizzy hair try this Citrusy essential oil.  
Rosemary is great for thickening hair. It can help prevent baldness, slow the graying process and treating dandruff and dry scalp.
Chamomile essential oil is a great essential oil for hair because it adds shine and softness to your hair while soothing your scalp.  It can be used to lighten your hair naturally. 
Cedarwood essential oil can also help to reduce skin irritations and repel bugs, which can be beneficial on summer nights when you’re spending time outdoors
Lemongrass essential oil has healing properties, and it works as an effective cleanser and deodorizer. It can strengthen your hair follicles and soothe an itchy and irritated scalp. 
Peppermint essential oil helps to stimulate the scalp, and it can treat dandruff and even lice due to its powerful antiseptic properties.  It also stimulates hair growth.  Caution:  Don’t over do it, as it is a very strong essential oil

conditioner bars solid


Uncategorized

Say No to Hydrogenated Oils in Body Care

Do we really want to use hydrogenated oils in skin care?   The hydrogenated oil process is basically heating oils to a very high temperature which renders them rancid.  The oils are then treated with hydrogen. Many manufacturers add a perfume to neutralize the smell. The oils then become thick and spreadable.  This practice increases the shelf life of the oils.

I question heating oils at such high-temperatures.  It removes all the great properties we look for in crafting natural high-end body care.  Professional crafters take such pride to stand above the big commercial cosmetic manufacturers, we may want to consider upping our game by using nonhydrogenated virgin unrefined oils.  How do crafters label their products when using hydrogenated I wonder?

It is my goal to use virgin, cold pressed, unrefined and if possible organic oils.  Using these lovely oils does come with some caveats.  Virgin oils can have a shorter shelf life and are often not a neutral color. They can have a smell of the plant where the oils come from.  If you can live with that, go for it.  Virgin oils can also be a little more costly.

Coffee Butter  Non Hydrogenated

Let’s look at the coffee butter on the market.  Most contain hydrogenated vegetable oils  It looks great, smells wonderful that is true. It must be less expensive to produce and that means higher profit margins for the producer.  Soap & More manufactures their own coffee butter using refined coconut oil (no smell and a hard oil) combined with fair trade coffee infused MCT oil and coffee essential oil.  This is what makes us stand out as we continue to march to the beat of our own drum.  Most aloe vera butter on the market is also manufactured with the use of hydrogenated vegetable oils.  Keep an eye out for the inferior oils and butters.

Vegetable oils contain a number of nutrients that play an essential role in the metabolism of our skin.  They are at the basis for having lovely skin.  This is a good reason why one should make use of the vegetable oil properties, especially by mixing up their skincare uses, but one must first understand the way they should be extracted in order to get the best out of their use!

Vegetable oil is qualified as virgin or refined according to the way it has been extracted.  If the extraction is done by pressing, then it is considered virgin oil.  If the extraction is carried out by solvents, then it is called refined oil, which allows one to obtain a “standardized” oil by modifying its fatty acids.  But for the case of “virgin” oils, one gets an oil that is pure, without any foreign substances, exclusively purified through physical processes, and cannot have been submitted to any other treatments.

After refinement, degradation of the nutritional value occurs.  This means the natural Vitamin E  with its antioxidant regenerative and anti-inflammatory properties are gone.  The loss of the biological activity of essential fatty acids which are the base for a hydrated, plump, and dense skin, that is supple and luminous occurs.  The beta-carotene, a powerful antioxidant element is degraded as well as the disappearance of phospholipids and sterols that play a key role in cellular growth and the function of the skin’s plasma membrane.

Natural Body Care Products for the People who Want to Know!

Virgin versus refined carrier oils & butters

oil drop

My take is somewhat bias towards unrefined carrier oils & butters.  Embracing the natural essence of the oil or butter for all can do for your skin with as little processing is preferable.

What is the difference between virgin oil and refined oil?

Vegetable oil is qualified as virgin or refined according to the way it has been extracted.  If the extraction is done by pressing, then it is considered virgin oil.  If the extraction is carried out by solvents and heat, then it is called refined oil, which allows one to obtain a “standardized” oil by modifying its fatty acids. Cosmetic companies prefer a more standardized oil with little or no color and no aroma.   But for the case of “virgin” oils & butters, one gets an oil that is pure, without any foreign substances, exclusively purified through physical processes.

Why refine oils?

The refining process creates oil that is stable, easy to preserve, hardly colored, with no discernable aroma, and with a yield around 97 percent which is much more profitable to the industry.  Refining can also extend the shelf life of carrier oils.  However “pressed” oils preserve all their qualities, are more expensive, and can lose up to 20 percent of its substance when extracted.

Which one is best for my skin?

After refinement, the original composition of the oil has been deeply modified that results in an almost total loss of the healing active properties.  Refining can cause:

• a destruction of vitamin E, with its antioxidant, regenerative and anti-inflammatory properties

• the disappearance and/or the loss of the biological activity of essential fatty acids which are the base for a hydrated, plump, and dense skin, that is supple and luminous

• the disappearence of beta-carotene, a powerful antioxidant element

• even the disappearence of phospholipids and sterols that play a key role in cellular growth and the function of the plasma membrane

We encourage choosing virgin oils & butters for a healthy and beautiful skin.

Recipes, Soap Recipes

Jelly Soap (Vegan)

Jelly soaps are so much fun and kids love them. They are jiggly, sparkly soapy fun!

  jelly soap

FORMULA

225 ml  glycerin
1 TB  carrageenan iota powder
200 ml distilled/purified water
25 grams Lanthanol

Cool down phase ingredients:
25ml  Cocamidopropyl Betaine 
1 tsp optiphen (the very high % of glycerin contributes greatly to preservation in this formula)
1 tsp fractionated coconut oil or almond oil or rice bran oil
1/4 tsp essential oil or fragrance oil
1/8 tsp color powder in 1 tsp water and stir until combined

Important tips:

If the recipe does not set add 10% more carrageenan.  (Another reason why the shower jelly may not harden could be the mix was not heated to a sufficiently high temperature).

  • To color, use dilute your powdered colorant in water.  Micas add sparkle to your creation.
  • hand stirring can be used.   (A stick blender will create lots of foam).

Process:

  1. In an empty container add the glycerin
  2. Add the carrageenan into the glycerin and mix well
  3. In a separate pan add distilled or deionized water and heat
  4. Add the lanthanol into the water whilst mixing and heating using a stick blender
  5. Add the carrageenan/glycerin mix to the lanthanol/water mix and heat to 200°F/95°C.
  6. In a separate container combine the cool down phase ingredients, which are: optiphen, Cocamidopropyl Betaine, oil, fragrance
  7. Let the heated mixture cool to below 140°F/60°C and before it starts to gel, add color and stir
  8. Add the cool down phase ingredients, stir
  9. Pour into preferable silicone molds or an ice cube mold
  10. Let the shower jelly cool and set before unmoulding
  11. Have fun!
Recipes, Soap Recipes

Gentle Solid Shampoo Bars: Yields 2 x 80g bars

shampoo bar ph 5.27 Nov 18

There has been some talk about solid shampoo bars having high PH which is not particularly good for hair.  A nice, PH balanced shampoo will keep your hair and scalp in good condition.  It is all about the chosen surfactants.

We will keep updating and adding great information for changing up the formula for an enhanced finished product.

Benefits of our Solid Shampoo (Syndet)

  • Ease of travel
  • Gentle and silky
  • Easy to make
  • Low PH

The word “syndet” is derived from “synthetic” combined with “detergent”. Technically it refers to the binding that occurs between different detergents, also called surfactants. These detergents, which have an affinity for oils and repel water, surround dirt with small structures that are then removed by water.

Gentle Solid Shampoo Bar Recipe Yield approx 300 grams 

1st Heated phase

1 1/2 tsp 1.7% Cocamidopropyl betaine (heat separately and add the panthenol powder if using it) Surfactant 
5.5 TB SCI 37.7% Sodium Cocoyl Isethionate gentle surfactant (crush up in a baggie if not using a powdered form.  Melting is preferred to pressing your surfactant. 
2nd Heated Phase
1 3/4 tsp 3.4% Kokum butter. (if using volume and not % melt to measure)  Moisturizer & conditioner
1 3/4 tsp 3.4% BTMS 25 Conditioning emulsifier 
1  tsp 1.9% Cetyl Alcohol emollient, emulsifier

3/4 tsp 1.5% protein of choice (Hydrolyzed Silk or Baobab Protein)  improves elasticity, resiliency, and restore the moisture balance for smoother and softer hair.

1/4 cup plus 2 tsp 33.28% Lathanol SLSA, Sodium lauryl Sulfocete. Surfactant powder for foam. 

Cool-down phase 

2 TB 13.7% alpha-olefin sulfonate or Caprylyl/Capryl Glucoside due to the low ph in these mild surfactants  

Optional

1/2 tsp 1.14% Panthenol powder  Humectant that helps give body & shine and detangling properties to hair. It can cause curly hair to frizz, however.  If you omit this, add this % to the SCI or SLSA (add to 1 heated phase.  Be careful to not let it burn)

1/2 tsp .57% scent  (more can be added depending on your choice of scent)

Optional: Water-soluble dye or micas for color. Manganese Violet is known to brighten grey hair and reduce the brassiness in blonde.

 Directions:

Melt your 1st heated phase over the stove at medium heat.  At the same time in a separate vessel heat, your 2nd heated phase by totally melting the kokum butter then add remainder of the 2nd heated phase and continue to heat until melted. Combine both heated phases mix well and remove from the heat.  If you find the 1st heated phase needs more moisture, multiply the Cocamidopropyl betaine by up to 3 times.  It may take your final bar longer to harden.

Mix in your cool down phase.  If adding color, this is the time.  

Allow to cool to 80 Degrees Celsius or less and mix in the Optiphen Plus, and scent, color (judge this and use sparingly) if using and combine.

Press tightly into your mold and allow to firm up. (Not a smooth batter so beware) Your mold can be placed in the freezer for a couple of hours.  No need to cure or cover.  Can be used after 24 hours.  Lather the bar in your hands at first, add to your wet hair and then use the bar directly on your hair for more lather.

Essential Oil Ideas

Bergamot can be of great benefit to thin, dry hair that breaks.  It increases shine & can help make a protective barrier if you style your hair with heat.  If you have curly or frizzy hair try this Citrusy essential oil.  
Rosemary is great for thickening hair. It can help prevent baldness, slow the graying process and treating dandruff and dry scalp.
Chamomile essential oil is a great essential oil for hair because it adds shine and softness to your hair while soothing your scalp.  It can be used to lighten your hair naturally. 
Cedarwood essential oil can also help to reduce skin irritations and repel bugs, which can be beneficial on summer nights when you’re spending time outdoors
Lemongrass essential oil has healing properties, and it works as an effective cleanser and deodorizer. It can strengthen your hair follicles and soothe an itchy and irritated scalp. 
Peppermint essential oil helps to stimulate the scalp, and it can treat dandruff and even lice due to its powerful antiseptic properties.  It also stimulates hair growth.  Caution:  Don’t overdo it, as it is a very strong essential oil